
Ventrilo Setup Guide
Ventrilo is a Voice over IP (VoIP) software for group communication. The Eternal Vanguard use Ventrilo primarily for communication during group events such as PvP, raiding, and guild meetings.
The following is a short step-by-step tutorial to help you get the Ventrilo client software setup and ready to go. Before you begin please make sure that you have the following Ventrilo Server information, either from the Guild Info tab in game, or from an Eternal Vanguard Officer. If you do not as yet have the Ventrilo client downloaded to your computer, you can download it from here.
Server information needed in advance.
- The name of the Ventrilo server. This is your name for the server and can be anything you want.
- The Ventrilo servers hostname or IP address.
- The Ventrilo servers port number.
- The Ventrilo servers password.
Step 1: Setup a user logon name.
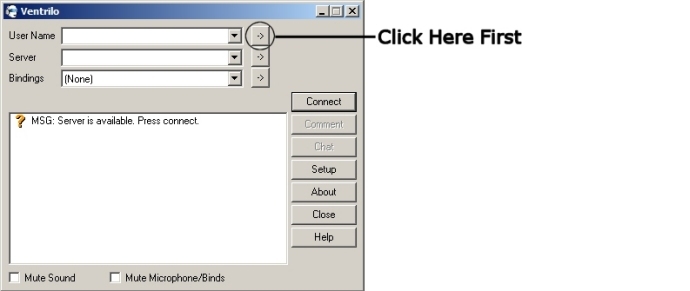
Click the uppermost arrow button as shown. The “Setup User” window will now open.
 Now click the “New” button. This lets you create a logon name of your choice. It can be anything you would like it to be, but Kinsmen prefer that you use your in-game character name. (In this example, I’m using Zoh).
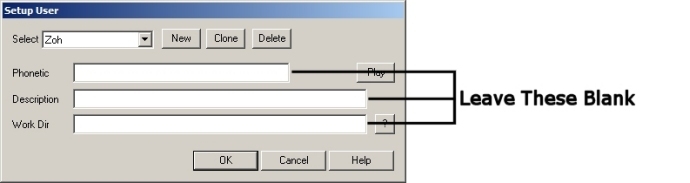 The other fields in this window are for more advance users, so just leave them blank. Go ahead and click the “OK” button and the program will return you to the main window.
Step 2: Create a server definition.
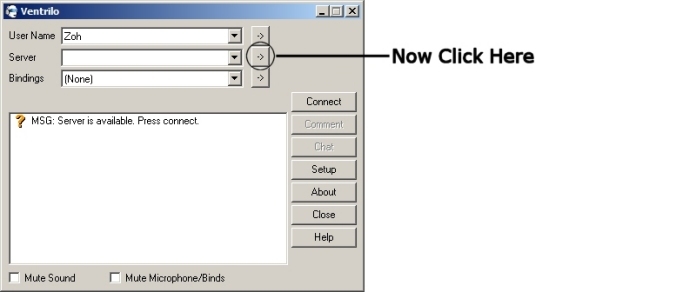 Click the middle arrow button as shown. The “Connection Editor” window will now open.
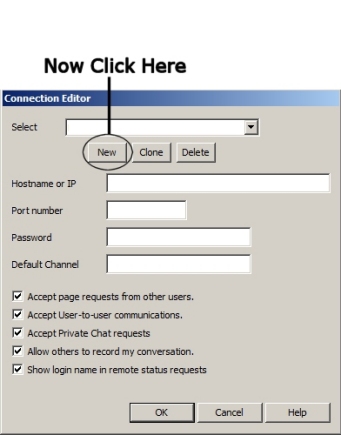 Now click the “New” button. This lets you create a name that will be associated with the server you are about to define. It can be anything you would like it to be such as “Guild Server” or “My raiding server”. The name is entirely up to you. (In this example, I’m using the name “My Server”).
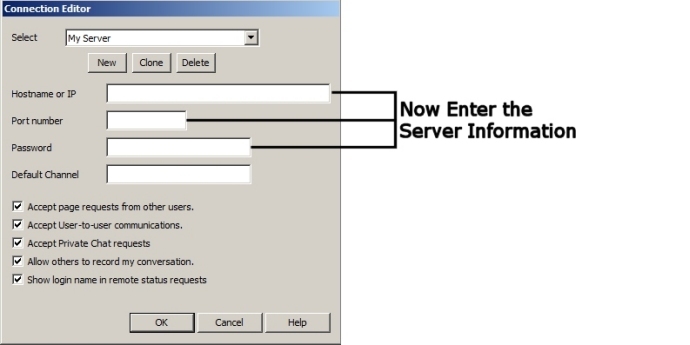 After you give it a name all of the other input fields in this window will be enabled. As mentioned earlier you will need to fill in these fields with the information given to you by either the ingame Guild Information panel, or by a Guild Officer. Fill in the fields and click the OK button when done.
Step 3: Connecting to the server.
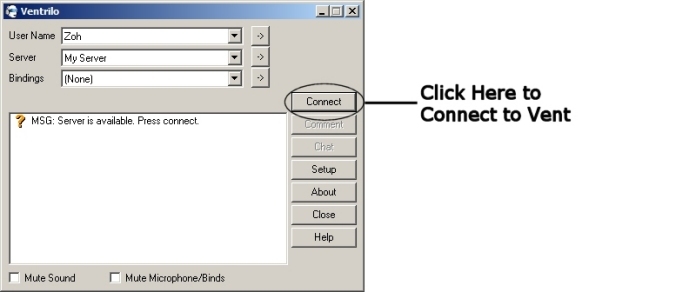 Click the “Connect” button. If you created a valid server definition then the program should connect to the server and you will see a bunch of channel names and possibly other users who are currently connected to the same server. Your user name should show up somewhere in the user list window as well.
 NOTE: If you click the connect button and it just seems to sit there for 15 to 30 seconds then you either entered the wrong information when you defined the server or the server you are trying to connect to is currently offline. In either event you should contact a Kinsmen Officer and request their assistance.
Step 4: Choose transmit style.
That’s all there is to getting the client up and running. However, you need to decide how you would like to transmit. Ventrilo supports two different transmission styles:
1) The first and default mode is called “Voice Activation”. In this mode the program will monitor your sound cards selected input device and when the signal strength reaches a certain level the program will start transmitting.
2) The second mode is called “Push-to-Talk” or PTT for short. In this mode you must tell the program to transmit by holding down a specific key on your keyboard or button on your mouse. You can also define a button on a game controller if you like.
To change the transmit mode please follow these instructions.
4-a: Open the Setup Window
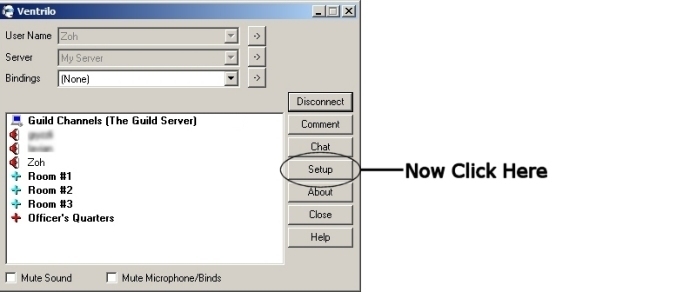 Click “Setup” from main window. The “Setup” window will appear. The default transmission mode is voice activation mode. We will set up “Push-To-Talk” instead.
4-b: Be sure you are in the “Voice” Tab
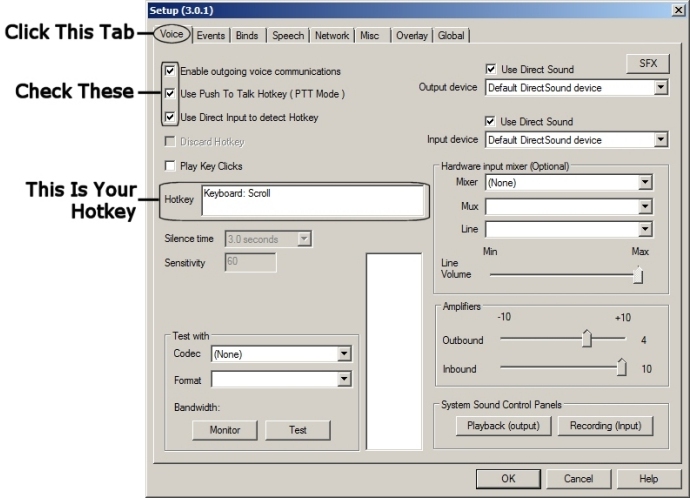 4-c: If it is not already checked, checkmark the option called “Enable outgoing voice communication”. Check the option called “Use Push-To-Talk hotkey”. You must also tell the program what key / button to use in the “Hotkey” window.
4-d: Check the option called “Use Direct Input to detect Hotkey”.
4-e: Press the desired keyboard key / mouse button. You should see that key / button appear in the “Hotkey” window (In this example, I used the “Scroll” key on my keyboard). You can also use a mouse button as well. Just be sure the key or button you choose is not one you normally use in-game.
Step 5: Setting up hardware functions.
The program has many options for controlling the hardware and it’s functions. These are sometimes very important depending on your Operating System, hardware drivers and other applications installed. The following items are highly recommended for an optimal configuration.
In the “Setup” window select the following options.
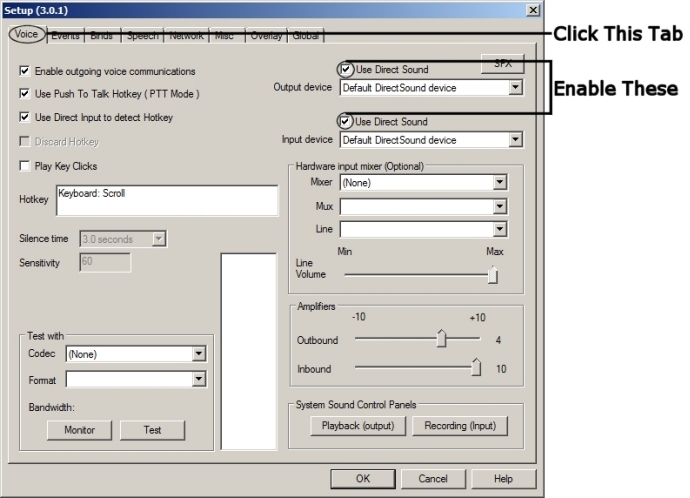 5-a: Be sure you are in the “Voice” tab.
5-b: Enable the “Use DirectSound for Output device” option. This will make your Output Device the “Default DirectSound device”. If you have more then one sound card you will need to select which device you want all voice communication to be sent to.
5-c: Enable the “Use DirectSound for Input device” option. This will make your Input Device the “Default DirectSound device”. If you have more then one sound card you will need to select which device to monitor when you are transmitting.
5-d: Click the “OK” button to accept and close the “Setup” window.
If you would like to know more about all of the different options on the Setup window then please click the Help button. The documentation is very extensive and should answer all of your questions about what each of these items does and what to watch out for.
The Ventrilo client also has many user selectable customization options. For example, if you would prefer to see the program in it’s new ToolBar mode then simply right click in the main window, select View and then select ToolBar mode. If you would like to know more about any of the menu options then please click the Help button from the main window.
That covers the basic setup for your Ventrilo client! Please remember that Kinsmen officers are available to help you with your questions. See you in-game!